For many guitarists, one of the most challenging hurdles is learning how to change between chords smoothly and efficiently enough to keep up with the tempo (speed) of your favorite song. The following is a process that I teach that has proven effective for many students and will be useful for any guitarist struggling to change between any two (or more) chords.
Step 1: Memorize Each Chord
Having each chord memorized can greatly help in understanding efficient movement. Memorization helps to eliminate the confusion that occurs when we are not sure of where to move their hand as well as help us to not “rush” into a harder chord-change variation.
Step 2: Find Fingers That Do Not Move
When changing chords, many of us make unnecessary motion, slowing down the chord change or preventing memorization. The most effective means to remove this unhelpful movement is to search for fingers that stay in the same place while moving between any two chords.
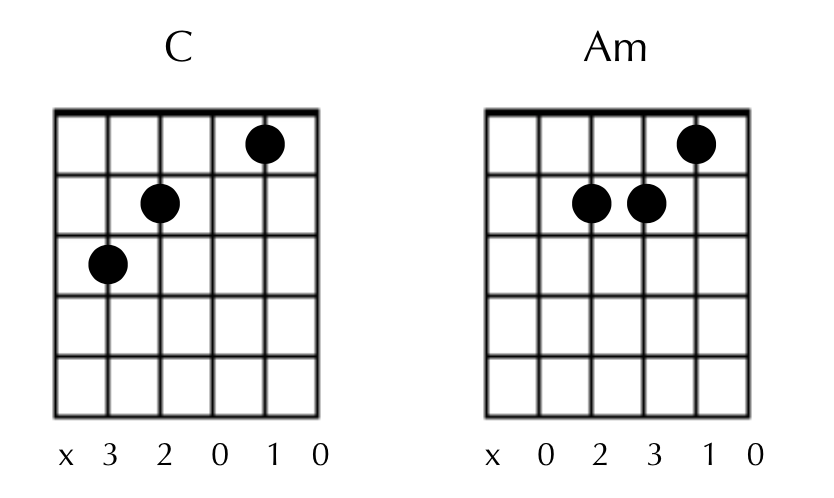
Consider the following example – moving between the chords C and Am. Both of these are common chords, and a beginning guitarist will see these two commonly.

Do you notice any fingers here that stay on the same string and fret for each chord? A close inspection will show that the first finger (marked with the 1, under the chord chart) and the second finger are in the same place for both the C major and A minor chords.

Therefore, the most efficient movement between C and Am is to move only the third finger.

Step 3: What To Do When All Fingers Move
Many chord changes seem more challenging than the move from C to Am, simply because all fingers move. In the case of changing from D to G, as an example, each of our three fingers must move to new strings and/or frets.

The best method for changing shapes is built upon systematic movement. Which finger will move the shortest distance? In this example, the third finger moves the shortest distance. Therefore, before moving any other fingers to the G chord, practice moving the third finger to the first string, fret three…its home for the G chord.

Then, the remaining fingers move in the same manner. Of our two remaining fingers in this example, the first finger need only move two strings, from string 3 to string 5, while maintaining the same fret.

Finally, our second finger moves from one outside string (string 1) to the other outside string (string 6). The other fingers aid in this movement; by staying on their new strings/frets, the fingers act as guides for the second finger’s move.
It is very important not to lift all of your fingers off of the fingerboard for each chord change. Doing so this negates the benefit of moving in an efficient order, preventing muscle memory.
To move back to D, simply move each finger in the same order.

